I took the picture right after I got back from the bike shop, so the saddle is still lower than what I normally ride with.
That was yesterday afternoon. Since then, I took it for a little ride along the nearby Hikiji River and then today I went for a longer ride to Oiso. I can say with all sincerety that this is pretty much the bike I wanted. It is really solid and can be ridden over all kinds of stuff like gravel and sand without having to worry if I might slip or damage the bike. I took a bunch of pictures and I think this entry will be very much tech oriented, so if you're not into that, I'm sorry, but please let me indulge as I am still so happy to have this "new" bike.
This was along the Hikiji River yesterday with rice fields in the back. I've raised the saddle and put on the rear rack. You don't see too many people using rear racks here other than on mamacharis. Also, you might have noticed that this bike has a kick stand. That wasn't standard issue, but I knew that almost everytime I park the bike, it will come in handy, so I had it put on at the shop.
The tires are the Schwalbe Marathon 700 x 28. These are pretty wide tires for me, but there's a lot of bumps on the roads around here, so these are much better than skinny tires.
The rims are Salsa Delgado Cross. The shop guy picked these which was a surprise, but I know of Salsa as a maker of mountain bikes and components, so I think these will be plenty tough.
Avid Shorty cantilever brakes. One thing I wanted on my new bike were cantilever brakes. I wasn't unhappy with the performance of the sidepull brakes on my old bike, but I never liked the complexity of them. With cantilever brakes, they are simple and you can see exactly how they work and so they are easy to take care of as well.
As you can see, I've got quite a bit of stack under the stem. On my old bike, I had less, but it seemed with this frame, I needed this much to achieve the same position. I'm not sure if the top tube is low on purpose as this is a cross frame. If I was to build a custom frame, I would probably have the top tube a bit higher, but the bike rides just fine as it is, so, I'm OK with it.
The kickstand. Not sure the make, but this works great. You can adjust the length of the leg by turning the striped collar. There are almost no bike racks anywhere you go in Japan, so the bike needs to be able to stand by itself. Bike theft isn't as much of a problem here especially in this more rural city of Fujisawa, so you don't need to lock the bike to something else as you would in the US.
Anyway, this bike and I are definitely gonna go explore all over this area. I'm really looking forward to it and I will be reporting on our trips for sure. I haven't thought of a name for it yet, but if you have any suggestions, I'm all ears.
So, as I wrote in the last entry, I am working on a new bike for myself. Above is what's left of the previous bike; handlebar, stem, levers, saddle, seatpost, crankset, bottom bracket, derailleurs and chain. I had meant to bring the wheels which is the next most important (and expensive) part of a bike after the frame, but I had no way of bringing them with me here. So, this is all I have left and I started thinking about building a new bike with that.
After some thinking, I started entertaining the idea that maybe getting a custom frame could is a real possibility. I had been looking at sites of various Japanese frame builders and came across this one which is the builder Nakajima, but they also sell Toei frames.
I had seen this Toei Commuter a couple of years ago while walking around Tokyo. It's a very nice bike and it seemed to have a good reputation among their owners. I thought it would be a good frame to consider as it is very reasonably priced for a custom frame at the starting price of 87000 yen ($995 US at writing of this entry) and the waiting is much shorter than it is in the US. I wrote an email to Nakajima while I was still in Portland to inquire about it and maybe get the process started early, so I could have the frame done sooner. Unfortunately, he never responded to my email.
After I arrived in Japan and I had mostly settled down in my new place, I started again to try and put the new bike together. On the Nakajima site, it said that the Toei frames are now taking about 7 months, so at that point, that seemed too long as I wanted to have it before this Summer was over. I started looking at the Nakajima bikes which didn't look as good to me before, but there were pictures of more recent ones like this one above looked OK, nice and simple. So, I called Nakajima and had a talk with him. This was really the first time for me to talk to a builder with the intention to possibly buying a frame. I was quite unsure of how to talk about it and I had a lot of questions, but he seemed really uninterested and almost seemed to want to talk me out of it which he succeeded after he told me the wait was 1 year.
I had looked into other builders as well, but none were as cheap as Nakajima or Toei, so I gave up on the idea.
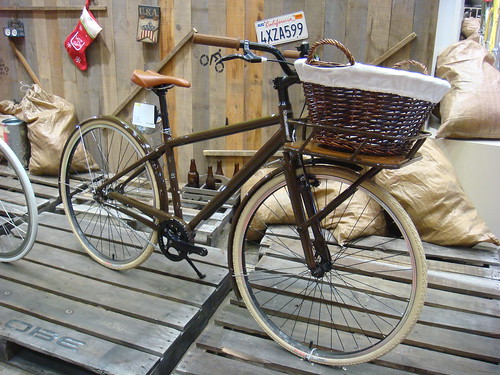
Then I looked at the semi-custom frames by Panasonic like this one above. You can order this frame in 3 sizes (460, 510, or 550) and in any of 28 colors you like and it will be finished in 14 days! The only thing I couldn't tell was what the wheel size is. It kind of looks like they could be 26 inch, but even if that was the case, this seemed like a good possibility, so I went to a local Panasonic dealer to ask about it. I was quite ready to go ahead and order it, but I asked just in case if they had other steel frames that were similar. It was a good thing I asked because they indeed had something even more reasonable.
Yes, that's a Surly. All of you in North America are probably quite familiar with the Surly brand. They are quite a popular brand in Portland for sure. I'd never been super attracted to Surly's myself and I'd been thinking my next bike will be a Japanese brand, but this Surly frame was much cheaper than the Panasonic and with all the parts I still need to buy to complete the bike, I can use all the savings I can get. Many of you keen observers probably noticed that the bike is the Surly Crosscheck and not the popular Long Haul Trucker. While I have no intention of racing cyclocross, the LHT will be for the 26 inch wheels in my size, so I opted for the Crosscheck which are made for 700c wheels in my size. The only misgiving I have with this frame is that the bottom bracket is slightly higher than normal making the center of gravity higher, but I think I will get used to it and with this frame, I can be much more confident going over rough roads which there are plenty of around here.
Anyway now, the shop had ordered the frame for me and it is waiting for a few more parts to arrive before being built. They are building new wheels for me instead of getting pre-built ones as the kind of wheels I wanted weren't available and the parts for the wheels seem to be taking a long time. I called them today and they said it will be 1 or 2 weeks still. I was hoping to get it this week, but I have to be patient.
Anyway, so after looking at more exotic possibilities, I will end up with a very ordinary Surly bike. I'd been riding Kao's Trek ever since I'd been here and it's pretty good, but not quite right, so I'm really looking forward to getting my own bike and dialing it in and riding it all around this area which is quite a haven for cycling in this part of Japan.
As I had written in the previous post, my road bike had sustained an injury in the way of cracks in the head tube.
On Saturday, I took the bike to a local bike shop, one that has quite a good reputation, to seek professional opinion about this damage. I did read up quite a bit online about cracked aluminum frames and it looked mostly hopeless, but still I didn't want to retire it without having it looked at by an expert. Maybe there is a chance they know an aluminum welder who can fix it?
Well, the verdict was that there was pretty much nothing they could do other than to sell me a new frame. They asked me if I was the original owner of the bike (I wasn't), so perhaps the manufacturer can replace it it or sell me a new one at cost if I had bought it as new. The final piece of advice was "not to ride it anymore".
I actually rode the bike there and back. The ride home was one of mixed feelings. The weather was super nice, perfect bike weather, so it felt very pleasant, but I was quite sad that this may be the last ever ride on this bike.
I spent the weekend mostly indoors. Ironically, the weather was what I'd been waiting for the last few weeks, so I would've definitely gone for a ride had the bike not been decommissioned. Instead of actually riding, I did so vicariously through watching the Paris Roubaix super early Sunday morning. After the weekend, I felt quite unhealthy from the lack of exercise and keeping irregular hours. On Monday night, I had the worst stomach ache I've had as far as I can remember. I don't think the lack of physical exercise was the only factor that caused it, but I had been feeling kind of unhealthy and in need of some physical activity. For me, because I work at home, I tend to lead a very sedentary life and riding around town for errands on the other bike isn't quite enough exercise for me. That other bike KT (Kao's Trek) is a road bike with Milano bars set up for upright position, so I could put drop bars on it again, but then I wouldn't have the town bike which is much better for short utilitarian rides.
It's such a waste to have this bike that I had dialed in and it was just the beginning of the season to go out for long rides. Well, I don't know about long rides, but at the least, I felt the need for it as it provided me with my only prefered way to exercise. So, I made a quick trip to the local hardware store and fixed the bike!
Well, it's a temporary fix for sure. I have no illusion that I will be able to keep on riding it this way for too long. But at least, I will have it to ride a couple of times a week. Maybe it will last until I move to Japan. The other change I made was to switch the pedals (yet again) to platform pedals, just so that in the event that the headtube cracked, I wouldn't be clicked into the pedals and be able to react quicker. The clamps are quite strong, so I think it will keep it from further damage. Anyway, I will keep an eye on the crack with each ride and if it seems to have gotten bigger, then I will stop riding it.
This is just something I'm doing on my own accord and I wouldn't recommend anyone to do the same if they had the same problem though.
The things I've learned from this are two things. One is that aluminum bikes may not be as reliable as I had thought. I had two aluminum bikes prior to this and I had no problem with them. One I sold to a friend and one I got stolen, but they seemed almost bomb proof (especially the mountain bike) and worked perfectly while they were in my possession. The other thing is that buying a used bike online without looking at it first is risky business. After having had my mountain bike stolen, I knew I wanted a faster bike I could ride longer distances with, but such bikes are quite expensive new, so I went to Ebay to scout used bikes there. I am no expert at Ebay, so I probably didn't look carefully enough at what I was bidding on. I bid on a few bikes and when I finally won the bidding for this bike, I was just so happy that I was able to buy a bike of this quality for probably third or quarter of what it would cost new. It wasn't quite perfect when I got it and when I had the bottom bracket replaced, the mechanic at the shop told me the bike looked like it's been crashed. That was a bit scary and the bike did make mysterious noises which seemed to come from the lower end of the frame, but I never suspected any damage around the head tube. I'm not sure if I just didn't notice it or if there was damage which was hidden under the paint until recently, but either way, I think it was not me that caused the crack. I think it was already damaged when I got it and just got aggravated more as I rode it.
Anyway, so I think I've learned my lesson and I will do neither of these things next time.
In fact, I'd been looking at what options there are in Japan. I saw one place that can build custom steel frames as low as 80000yen (about $860). That sounds pretty good to me. I would have to look into it more, but now I'm actually excited about getting a new frame.
I think just as we humans cannot take good health for granted, you can't take a bicycle's health for granted either. I think some may last longer than others (steel longer than aluminum), but while you have a good working bike, you should really enjoy it.
Just as I was growing more fond of my Special K...
I went for a short ride yesterday to enjoy the rare sunshine and as I sat down on a bench at the Eastbank Esplanade, I shot this video to capture the moving platform and the river.
Then I looked at my bike in the bright sunlight and noticed something quite disturbing.
(this picture was taken after I got home)
Can you see the cracks in the headtube?
First I thought it was just cracked paint, but with a closer look it looks quite a bit like the aluminum under the paint is cracked as well. I did some reading online to see what this entails for Special K and it didn't look very promising. It could be that the days are numbered for Special K. Repairing it may be difficult and may not be worth it as it could be costly and could happen again.
I will have to get a professional (at a good bike shop) look at it first before I decide on what to do next, but I started thinking about all the possibilities.
Maybe get a new frame? The first frame that comes to mind, Rivendell Sam Hillborne, is too expensive for me. The Soma Saga and Velo Orange Polyvalent are much more reasonable, but they will require different size wheels in my size, so more expense is needed. Getting a new frame won't mean just the frame. It will require other parts as what's on Special K may not be compatible with the new frame. Also, it's may be worth it to wait until I've moved back to Japan to get a new frame as getting a full bike there will definitely be more expensive than just the wheels and the parts. I think for now, if there's something that can be done to prolong its life (maybe clamping the tube around the crack?), I will do that, then I will have time to save up and look for a good frame instead of getting a quick fix that may not be the right choice. Anyway, I will go to a shop today and seek out advice. If they tell me, it's too dangerous to keep riding it, luckily I have another bike at my disposal. It may not be a bike to ride long distances with, but at least it will help me in my daily life.
I think it was wishful thinking that we would have enjoyed more sunny Spring days lately. We had a few days of nice weather a couple of weeks ago, but it's been mostly coludy rainy days since. It's my third Spring here in Portland, but I guess I'm still not used to having so many cold rainy days in the Spring.
I thought I would have done some rides to places I haven't been to and written about them, but with the uninspiring weather, I haven't ridden as much as I would have liked.
Instead of writing about rides I haven't done, I thought I would write about modifications I made to my bike. So, this is going to be a bit tech oriented post. I sort of feel unsure about what this blog should be with posts that only may interest "avid cyclists" though. Recently, Copenhagenize blogged that "avid cyclists" are unnecessary for advocating cycling. I can understand that, but it doesn't mean that I can be less of an "avid cyclist" or be less interested in bicycles. I'm neither here nor there. I'm not a full on racer nor a cycle chic utility rider, but in between. It's not like this blog has so many readers and there's a clear mission, so for now I'll just write about things that interest me.
Anyway, so I have made a couple of modifications to Special K. Can you tell what they are in the picture above?
I replaced the stem and the pedals.
This is what the stem looked like before.
I felt a bit stretched out with this stem and recently, I've moved the saddle back a bit which made the reach even longer, so I wanted to get a shorter stem to get a more comfortable position. I looked around a bit for a new stem and my first thought was to get something more understated without the graphics. I looked at velo orange, but they didn't have any stems that could accommodate my bars. I also wanted to get a stem that could be adjusted to find the right position. There are stems that have pivots, but they were quite expensive and I wasn't sure about their reliability. Then I looked at Specialized stems because I knew they were adjustable with a inner sleeve. I am not loyal to the Specialized brand at all, but it seemed like the most adjustable and reasonably priced of all the ones I saw, so I decided to get it. I got the 90mm Comp-Set stem.
It has 10 possible angles or something like that, so you can fine tune your position as you see fit.
So, this is how it looks after I made the switch. It still has some graphics unfortunately, but it's slightly more subtle. I can definitely do without the "Innovate or Die" copy though. I don't know why the faceplate isn't black like the main body of the stem, but it does now cover the Specialized logo on the bar, so I would say the overall look is a slight improvement. Now if I could get rid of the red lines on the bars...
The other change is the pedals.
I (think I) first saw these Time Z pedals on Bike Hugger's modal bike (can't seem to find the link) and they looked like just what I wanted which were clipless pedals which could be ridden with regular shoes. It's been an ongoing search for me to find pedals that are perfect. My last pair which were the Crank Brothers Candy C pedals were great clipless pedals, but not at all good to ride with regular shoes. These Time Z pedals did look very promising as it has a wide platform and the binding mechanism didn't seem to protrude as much as other pedals did. The only way to find out was to get them and ride them. So, I did that.
I had high expectations for these and they are more accommodating than any other clipless pedals I've ridden with regular shoes, but still they are not like platform pedals. So, I think it was a slight improvement, but I'm not sure if it was worth the price.
I thought if I had regular shoes that are specific for these pedals, maybe they would fit better. I didn't want to buy new shoes just for this purpose, so I looked for used shoes at thrift stores and got these.
What I've done here is to cut off a couple of lugs of the sole to accommodate the protrusion of the pedals. This was also just a slight improvement, but it doesn't achieve anything near the feel of regular shoes on platform pedals. It's a very simple thing, how your feet feel on pedals, but I can't say that I'm satisfied with these.
For now though, I can't think of anything else I might try with these pedals and I can't justify buying another set of pedals, so I will just get used to these. I have been riding with this set up for short rides around town and I'm starting to get used to them although they still feel a bit funny.
So, that's what's happened with Special K. I'm not sure if this is interesting reading to anyone though. One thing I have been thinking is that though this bike isn't particularly special in any way, it's becoming more special for me personally with little modifications and some TLC. There's all kinds of beautiful bikes to be seen online (like at the recent NAHBS), but I think almost any bike can be special if you want it to be.
The weather has been much better this week and I have been riding my bike further and more often. The other day, I was riding around North Portland on some bumpy roads and I heard the Special K (my bike) make some noise. The bike had been making mysterious noises ever since I'd gotten it, but now there was some new noises as well. I wasn't sure what it was at first, but it turned out to be the saddle. You may recall that I had gotten the Selle Anatomica saddle last year. It's the first leather saddle I've had and I'd never had saddles that made noise before so this was a bit of a surprise. Afterwards, I tightened the bolt on the saddle and then the noise was no more. While I was at it, I decided to give the bike a check up. I'm not really an expert mechanic or anything, but I find that giving your bike some TLC once in a while does seem to make it ride smoother.
What I usually do is, I take a damp cloth and wipe all the surface area of the bike other than the chain. Then I flip the bike over and take the wheels off (which may be harder to do with heavy city bikes) and wipe the parts that were hard to reach with the wheels in place. I also wipe the wheels as well. You can wipe the tires too and check the wear of the tread too. Then I put the wheels back on, wipe the chain with a dry rag and apply clean lube. Then I take an allen wrench and check all the allen bolts to make sure nothing is loose. All of that is pretty easy and does not require any expert knowledge, but the last thing I usually do which is truing the wheels does take a bit of know-how, so I thought I'd write about that. Again, I'm no expert, so some of you may know much more about this than me, but I thought maybe this could be helpful for those who's never done it.
Just in case you don't know, truing a wheel is what you do when a wheel gets out of alignment. Wheels do sometimes can get out of alignment and become untrue after hitting a pothole or if you crash your bike. Major damage may need expert help or replacement, but for minor misalignment, you can fix it fairly easily.
The proper way to true wheels is to use a truing stand and a spoke wrench. I used to own a truing stand and with it you can definitely true wheels better, but even without it, you can do it with just a spoke wrench using the same method.
a spoke wrench looks like this:
or this:
A spoke wrench is a wrench for the nipple (yes, that's what it's called) that connects the spoke to the rim.
With a truing stand (like one below), you have the two metal pieces (calipers) which look like they are pinching the rim. You can control their distance to the rim by turning the knob. With a true wheel, you can bring them very close without touching the rim, however if it's untrue, the wheel will touch as you turn the wheel. What you want to do then is pinpoint where the wheel is touching. If it's touching on the left side at one point, then you take the spoke wrench to a nipple for the spoke going to the other side (to the right) on the hub and turn it counter clockwise. What that will do is tighten the nipple and pull the rim to the right and thus making it straighter. You can also tighten the nipples on the other spokes around the area. Unless the nipple was really loose, it's best not to over tighten them. Maybe give them a quarter turn at a time. As you tighten one part of the wheel, it may affect the tension of other parts of the wheel, so you can turn it and see if you notice other areas of misalignment. Also, after you think you've got it perfectly true and put them back on and ride, your weight might affect the tension, so it's a good idea to check it again.
Since I don't have a truing stand on hand, I make due without one. What I do is I flip the bike over and use the brakes instead of the calipers. You can't really move the brake shoes like you can with the truing stand calipers, so you just have to kind of eye it to see if a part of a wheel is coming closer to the shoes as you turn them. If you notice a misalignment, then you just tighten the nipples as you would on the truing stand.
You can't really get it perfectly true this way, but I think it's better than nothing as I tend to find loose spokes while doing this. If you don't do it, chances are the wheel will go out of alignment to the point of no return much sooner than if you regularly checked them. Also, even with damaged wheels, you may not be able to make them perfectly true, but you can get them true enough that they are usable, so you will prolong their usefulness.
Some bike shops also have truing stands that you can use. I think it's a good skill to learn and I kind of like doing it. It's kind of similar to oiling my work boots in a way. With proper care, wheels will keep turning and taking you places for a long time.
p.s. I found some how to videos on the YouTube. I won't link them here, but you can find them quickly by searching with keywords "truing bicycle wheel". Maybe more helpful than what I wrote here.
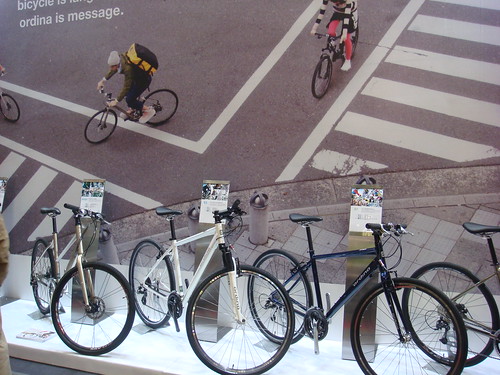
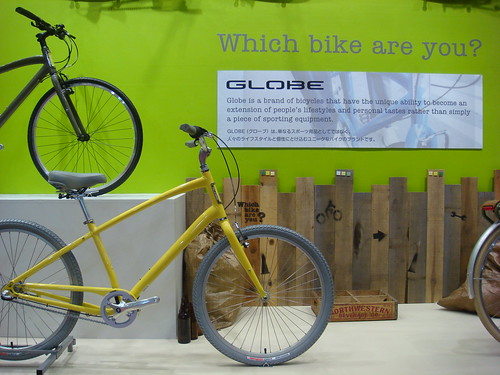
Yesterday we went to this event called Cycle Mode which is sort of like Interbike, but is also open to the general public. It was held in the convention center called Makuhari Messe in the city of Makuhari which is about half way between central Tokyo and the Narita airport in the Chiba prefecture. It was a weekday and a very rainy day, so it wasn't too crowded. They also offered free entrance for women on this day. I was in line to buy me a ticket when a man approached me and offered a free ticket. I was suspicious at first, but it turned out he had free entry already and had extra tickets. So, it was our luck that both of us got in for free.
The thing I wanted to do there the most was to test ride bikes, especially the high end road bikes. I've been looking at them in magazines, on the internet and in bike shops, but I haven't really ridden the more recent road bikes mostly made of carbon fiber. I'm not really in the market to buy one, but I thought I would like to ride them and see what they are about.
It was a huge show, so there was so much to see. We looked at so much stuff and took lots of pictures, so I will try and recount our day the best I can.
Right after the entrance awaited the booths of Eddy Merckx and De Rosa bikes. I've always liked De Rosa for their style and being one of the few Italian bike makers to still offer steel frames. They were definitely one of the bikes I wanted to test ride, but unfortunately the registration for test riding had already closed until 2 hours later.
We walked by the Pinarello booth which had a long line of people waiting to test ride, so we decided to come back to it and then we went to the Bianchi booth. Bianchi is one of the few bike brands that Kao knew of and wanted to test ride and the registration line was still open, so we got in line. It turned out that they closed the line right after us, so we just managed to get in. We waited a while (maybe little less than half hour) and then we signed up to test ride and they told us a time which was about an hour and a half later(!) to come back. So, even after waiting in line, we had more than an hour before we could test ride a bike. I thought I was going to test ride bikes one after another, but it looked like it wasn't going to be that easy.
So, we decided to walk around and just look at stuff and see if there was a bike we could test ride without too much wait. We spotted this cool classic Pashley in a booth nearby.
There was cycling class for children too.
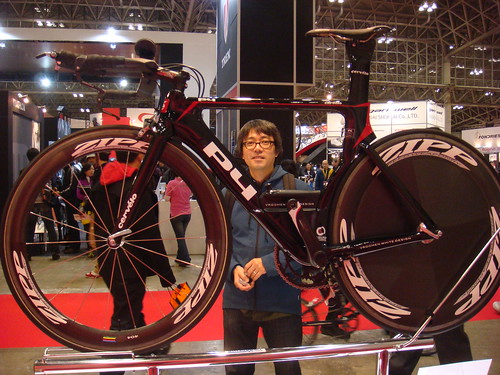
Then we came to the Cervelo booth.
Cervelo is really the cutting edge of race bikes. Like this P4 time trial bike above. I thought their bikes are things that belong in the elite road racing world, so I didn't even think I could ride one, but it turned out that their bikes were available to ride and the line didn't seem that long. We waited about 5 minutes to sign up and it was available half an hour later.
Kao opted to test ride a Masi entry level road bike which was available immediately.
Kao on the test course.
Kao's impression was that it wasn't actually all that different from her old steel road bike other than that the components worked much better.
This is the Cervelo RS that I rode. Kao took pictures of me riding it, so she will probably put them in a post soon. I was pretty thrilled to ride it so that I didn't really check the seat height before I took off, but as soon as I started, I immediately knew that the saddle was way too low. Being on the course for the first time with other people was also distracting. There was too much traffic to really pedal with any effort until the long straightaway at the end of the short loop. Officially, you're supposed to ride just one lap, but it seemed most people were riding multiple laps. I didn't really get enough of a feel with just a lap, so I kept going. The backside of the loop goes out of the building for a bit. It's shielded from rain with a roof, but there were little pools of water on the course. Enough water got onto the tires and onto the course inside the building and there was a sharp turn right after we go back into the building where the water on the building floor made it super slippery. I felt my rear wheel slip even though I wasn't going all that fast. I didn't fall, but I saw a guy fall right in front of me. Kao said she saw 3 poeple crash just during the time I was riding. I did try and ride with a bit of effort on the front straightaway, but it was way too short to really get a good feel. I ended up doing 3 laps. The bike was light and responsive and the carbon frame felt solid, but really the course seemed inadequate to really gauge the ride. The Cervelo RS is a climber's bike, so I would've liked to have gone up a short hill with it.
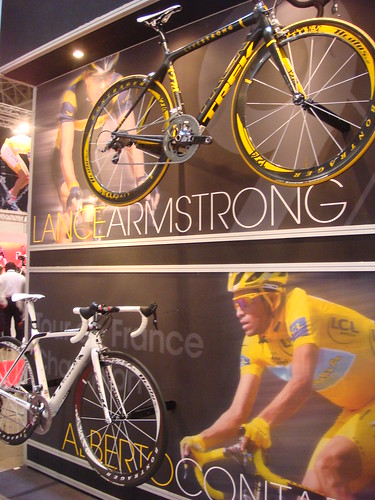
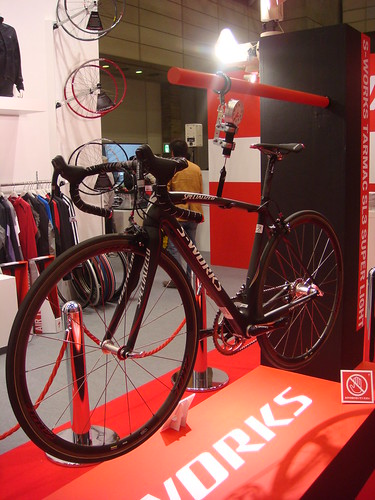
After that, it was time to go for our Bianchi test ride. Kao rode this Bianchi carbon road bike. She had never ridden a carbon bike and said it was much more impressive than the Masi aluminum bike. For my Bianchi test ride, I made sure to have the saddle raised this time. I also rode a carbon road bike. The saddle height was much better, but the handle bar/brakes set up seemed a bit awkward. I couldn't tell too much of a difference between the Bianchi with the Cervelo on this short course though. I felt the wheel slip a couple more times again and after the ride, I didn't feel too much more like doing more test rides. I also thought maybe riding other carbon road bikes might feel about the same with these conditions. As a fan of road racing, I like looking at the bikes that the pros ride, but I think having ridden these bikes, I'm slightly more over the mystique of high end road bikes. I thought these bikes were way too expensive for me to consider before, but I think now I would much prefer a custom steel bike even if I could afford a carbon race bike.
After that we just wandered around the big event space. One thing that really brought out the bike-nerd in me was the Dura-Ace di2 shifting system at the Shimano booth. The picture above is not the bike I rode, but the bike next to it was equipped with the di2. The di2 is Shimano's electric shifting system. Instead of pulling on the shifters, you only need to press buttons and then motors inside the derailleurs will shift the gears for you. It was pretty neat although you can only get so much out of shifting gears on a stationery bike.
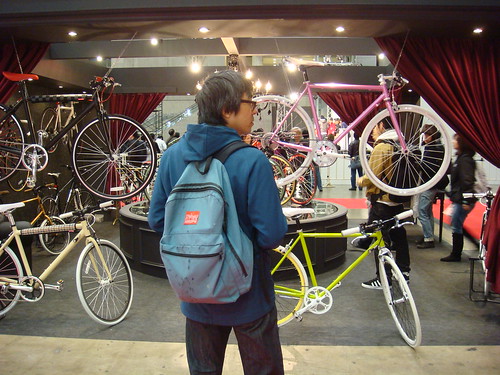
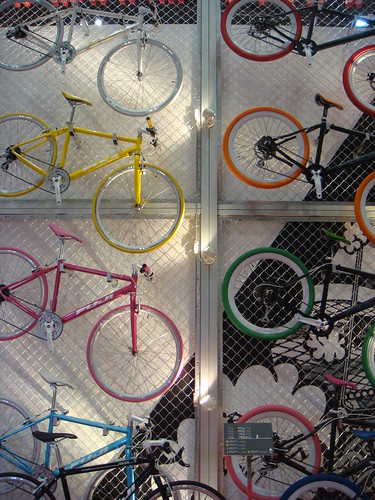
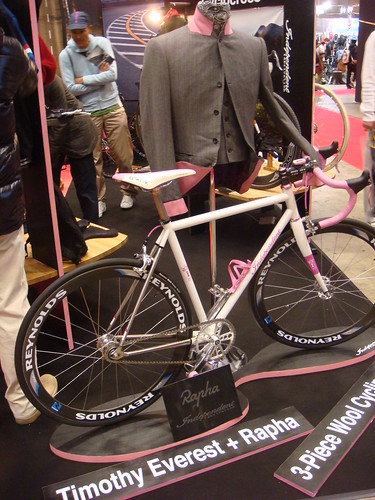
I think the most impressive display I saw was this Fuji display of track bikes.
I think these are actual track bikes and not street single speeds. I am not a huge fan of the whole fixie culture, but I like looking at track bikes used in real competition.
We found what I think was the most interesting booth after that. It was a booth made up of a whole bunch of makers of clothing and accessories. Yakkay helmet was one of them. I tried one out and it seems to look OK as far as I can tell in this photo.
There was also a maker of leather accessories called Maware. We actually spotted Mr. Fisher in this booth as we walked in, but he was just leaving so I didn't get to meet him, but later I found he also took pictures of these accessories and put them up on Twitter.
There were like 4 or 5 clothing makers that made clothing that were like regular clothes except they were made for riding the bike. I didn't get pictures of the clothing this time, but we got a lot of brochures and shop cards, so I think I want to look them up and do a separate post about them. Maybe we'll visit some shops as well.
Anyway, it was a fun event. We saw a lot of other stuff which I didn't write about like seeing Japanese pseudo celebrities speak at the talk show stage and various booths of bikes and gear and it would be impossible to recount everything, but you can check out more of the pictures I took in the slide show above or check out the flickr set here. I am not sure I will attend it again next year, but it was really fun and I think it's worth checking out if you're into bikes and you've never been to such an event.